
Thursday, 3 May 2012
Crowd
To make the crowd clap and cheer, I used the select and move tool, along with the rotate tool. I used the suto key function in order to record the animation.
Thursday, 26 April 2012
PROBLEMS!
While rendering, I came across a huge problem... everytime I tried to render, the alloted time was massive and after a few hours, the computer crashed. I tried time and time again to fix it, but to no avail. I knew the problem was hair and fur.
So I took out the hair and fur. To begin with I tried using a map image to use as grass, but it looked awful, I tried using different maps like bump, I tried changing settings like glossiness, I tried tiling it and moving the material alone on the plane but this still looked very un proffessional. So I just changed the colour to green.

So I took out the hair and fur. To begin with I tried using a map image to use as grass, but it looked awful, I tried using different maps like bump, I tried changing settings like glossiness, I tried tiling it and moving the material alone on the plane but this still looked very un proffessional. So I just changed the colour to green.

The outcome to this was a really quick render, and a more proffessional look.
Editing Plane
The plane I used for the ground was too square in the sense that you could see the corners in the final render.
To solve this problem, I made the plane bigger and used soft selection in order to make the plane 'hilly' and more realistic.
 I changed the falloff in the soft selection in accord to which area I was changing, 100 is the size shown in the screen dump above.
To solve this problem, I made the plane bigger and used soft selection in order to make the plane 'hilly' and more realistic.

Tuesday, 24 April 2012
Ascending Camera
After the camera following the helix, The next camera will follow the machines ascent from the sky in a vertical line. For this I used a free camera and just lowered it with the select and move tool, using the auto key function to animate and generate keyframes.


Thursday, 19 April 2012
Target camera animation
For the second scene in my animation, I needed a camera to circle the machine. In order to create this created a helix from the splines menu, I changed the number of turns to 2 and gave it enough room around the machine to allow for an overall view instead of a close up.
To allow the camera to follow the path I used a path constraint. I went to Animation > Constrains > Path Constraints and linked the camera to it.

To allow the camera to follow the path I used a path constraint. I went to Animation > Constrains > Path Constraints and linked the camera to it.

Tuesday, 17 April 2012
First animation within the environment
Today I started animating the models within my environment. The first thing that I wanted to do was to make the sail of the flying machine spin. In order to do this I simply used the rotate tool to turn the sail.
 I used the auto key facility in order to set keyframes to capture the animation. I extended the frames in the timeline at the bottom of the page by using the time configuration box and changing the end time too 300

The next aspect of the animation that I wanted to create was to make the machine fly up into the air and back down to the launchpad again.


The next aspect of the animation that I wanted to create was to make the machine fly up into the air and back down to the launchpad again.
To begin, I selected the whole model, all the different components and also the dummy model. I then used select and move tool in order to move the model upwards, and then back down to the launch pad

Tuesday, 10 April 2012
Environment 1
Today I concentrated on completing designing the environment for my animation. This took some time with rendering time as I wanted to keep checking what the finished product looked like.
For the trees, I used the inbuilt foliage tool, that I experemented with in a previous post, within 3ds max and chose different types of tree.
For the grass I created a plane and made it brown to act as the dirt, I then used the hair and fur tool to create the grass. To use the hair and fur tool I selected my plane and went into the modify list and selected hair and fur. In general perameters I put the hair count up to 1000000, hair segments 7 and hair passes 1, the density is at 100, i changed the scale as I wanted to make the plane bigger. I changed the colour to green.
I then merged my launchpad into the environment, followed by the crash test dummy and the Da Vinci machine. When merging I ensured that I also merged the materials as when I tried the first time they didn't import and the models turned out grey.
I wanted there to be a crowd in my scene so I used the 3dsmax biped models like the ones that we used in an earlier tutorials. I placed them around using both male and female skeletons. I selected certain polygons and changed the colours to make them look like they are wearing clothes. For the moment they aren't doing much but in the animation I want them to be clapping and cheering when the arial screw takes flight.

Tuesday, 20 March 2012
Reactor tool
In today's class we learned about the reactor tool. The first tutorial we did was a really simple concept of a block falling on a floor.
To begin I created two boxes, one large to act as the floor and one small to act as the falling object, I placed the smaller block above the floor and rotated it in order to give it a more interesting landing.
I then went to the animation menu and went to reactor > create object > rigid body collection; I then pressed add and selected the different components in the scene. Now all the objects are affected by the reactor.
In the reactor menu I gave the object a mass and had a fiddle with the friction and the elasticity to see what different outcomes it gives.

The second tutorial we did was to create a bowling alley using the same principles. After opening the rigid body collection, and adding the objects to the reactor, I gave the pins a mass of 10 and the bowling ball a mass of 20 I then used auto key and moved the bowling ball a little way down the alley, I also rotated the ball in order to make it look more realistic when the animation is finished.

Tuesday, 13 March 2012
Morpher
Today we used the morpher tool. We used this in order to create different expressions.

To do this we imported Richard's head model and created three copies, I gave each of them a differnent name according to which expression I wanted to give them.
The first model I edited, I was giving an open mouth. To do this I selected four polygons from the head's lower lip and chin and used the 'grow' tool in order to slelect the polygons around this area until I had the whole bottom jaw selected. I then used the 'select and move tool' in order to moove the mouth up and down.

The next expression I created was to shut the models eyes. I used the same technique as I used for the first one. I selected the polygons that represent the models eye lids and used the grow tool to select the amount that I needed. I then moced the selected polygons down in order to close the models eyes.

The third head model I gave raised eyebrows. The same technique as above is applied here. The final head model was uses to apply the 'morpher tool'. With this you can add different targets to the head in order to make all of the actions created apply to this model and then animate it.


We used the curve editor in order to select each target individually so you can control one at a time.
I used all three of my head models as targets and created a short animation of the head yawning. I found this tutorial very helpful and will be sure to use this technique in the future.

To do this we imported Richard's head model and created three copies, I gave each of them a differnent name according to which expression I wanted to give them.
The first model I edited, I was giving an open mouth. To do this I selected four polygons from the head's lower lip and chin and used the 'grow' tool in order to slelect the polygons around this area until I had the whole bottom jaw selected. I then used the 'select and move tool' in order to moove the mouth up and down.

The next expression I created was to shut the models eyes. I used the same technique as I used for the first one. I selected the polygons that represent the models eye lids and used the grow tool to select the amount that I needed. I then moced the selected polygons down in order to close the models eyes.

The third head model I gave raised eyebrows. The same technique as above is applied here. The final head model was uses to apply the 'morpher tool'. With this you can add different targets to the head in order to make all of the actions created apply to this model and then animate it.

We used the curve editor in order to select each target individually so you can control one at a time.
I used all three of my head models as targets and created a short animation of the head yawning. I found this tutorial very helpful and will be sure to use this technique in the future.
Wednesday, 7 March 2012
Experementation
Today, I was just tinkering around in Autodesk to see what kind of tools and techniques I could apply to my animation.
The first thing that I did was to try and model a tree. I looked on 'youtube' to see if there were any tutorials as I wasn't sure where to begin. It turns out that there's a function in 3DS max that has built in trees; this I was not aware of!
So, to make a tree you:
1. Open Autodesk and create a new scene
2. Go to the create tab and select 'AEC extended', then select 'foliage'
3. A list then pops up with lots of different trees, so select the one you need and click on the viewport
4. Click the modify tab and have a fiddle with the adjustment settings until you get the look that you need.
There were lots of different options in the modify (tree selected) tab. I was able to change the height, density and pruning (how high the branches start on the trunk) and also the overall shape of the tree by selecting the 'new seed' button.

Tuesday, 6 March 2012
Story Boarding
Today I drew up a first draft of my storyboard for my animation.
I'm going to have the helicopter model taking off from the launchpad with the dummy on it. The scene will comprise of a sky, grassy ground, a couple of trees and a crowd of people watching the launch (to make these I will use the in-built bi-ped model). I will also have a sky and a sun, within which I will encorporate a light to display sunlight.
I will animate the crowd to show them watching, clapping and cheering at the launch. The sail of the helicopter will spin in order to make the whole model move. The whole model will rise into the sky and then descend to land.
I will use a free camera, like in last weeks tutorial, to create path for the camera to move along. I will use the 'bank' facility in order to create a sort of birds eye vision of the scene.
The animation will end with a successful landing of the model.
Tuesday, 28 February 2012
Summary - First Six Weeks
The first six weeks of this module have been really interesting for me. I've really enjoyed doing all the research about DaVinci as I didn't really know a lot about him before; I think he was a really talented person and also prety inspirational.
I've also really enjoyed learning about the 3ds max software. I've found it easier than I expected it to be in comparison to learning how to use Flash last year; although I have got stuck and had my fair share of confused moments I feel I have got the hang of the very basics of the software and feel excited to get stuck into learning more about it and more animation tools in the weeks to come.
The three models I have created I feel pleased with especially the Da Vinci model, I think that it looks pretty realistic and as it was my very first model I'm really proud of it.
All in all; I'm really enjoyiong the module and feel I have learned a lot both from Richard and from using online tutorials.
Cameras
We also learned about cameras in this weeks tutorial. The first type we looked at was target cameras.

I set this camera on a path that I made from a circle spline. With the target camera you can select where the target of the camera sits. When the camera moves it moves around the path and contantly points at the manually placed target.
The second type of camera that we looked at is the free camera. This is how it sounds, free. there is no main target.

In this part of the tutorial we made a basic scene out of standard primitives. I then created a path using the line tool. With my path made I then inserted a free camera. I set this to go around the path I had drawn. The camera was for some reason pointing down so I rotated it so that it was facing the right way.
When I played the animation I noticed that it was travelling way to fast, so I slowed it down in the dope sheet. Ialso gave the camera a bank as it goes round the corners, this gives the simulation a sort of rollercoaster feel.
First Look - Animation
Today we learned the basics of animation of 3ds max. I enjoyed these tutorials and found it easier than making animation in flash.
The tutorial that we did was creating 3 bouncing balls bouncing at different times.

To do this I created one sphere to begin woth and animated it so that it just went up and down once. I then used the curve editor to make the bounce look more realistic by slowing the movement down as it reaced the top of the bounce and speeding it up as it is at the bottom of the bounce.
When I was happy with that result I then looped the motion so that it carried on throughout the entire length of the animation.
I then copied the ball twice so that I had three balls. I opened the dope sheet and edited it so that each ball bounced at separate times and at different speeds.
I had a bit of a problem on my first go as I had made copies of the sphere when auto key was still active this made it look like one ball morphing into three!
I was happy with the outcome of this tutorial and very much enjoyed it.
Tuesday, 21 February 2012
Launch Pad
The third model I will create is a launch pad for the arial screw. In order to create this I used lots of different standard primitives aligned and attatched together to make the launch pad.
I wanted steps up to the platform so I had a look at the stairs tool. I tried the different stairs avaliable, for instance, spiral stairs, straight stairs, Ltype stairs and Utype stairs, none of which gave the effect I was looking for; so instead I used the box tool to create the steps and attatched them together using >editable mesh > attatch.
The materials that I used on the launch pad were three different wood textures. I chose wood as I have seen from the research I have done on Da Vinci and the time, wood would have been the favourable option.
I am happy with the finished result and really enjoyed making this one.

Da Vinci Giant Crossbow And Final Decision
The third design that I had looked at was the giant crossbow. This invention really stood out for me as I thought the pure scale and reason for design were outstanding.

Da Vinci knew that the fear that a weapon bestowed on the enemy was just as damaging and dangerous as the damage it could physically inflict.
This crossbow was intended to be 27 yards wide and would have had six wheels each side.
Final Decision
I chose the arial screw over the other two designs as it is my favourite. I think that the idea was revolutionary and I feel that I could encorporate more skills into the arial screw than to the other designs I have looked at
Crash Test Dummy
The second model I have produced will be a 'crash test dummy', a humanoid shaped model with the intent to display how the people would have used the machine. I wanted to make the model quite simply, just primitive shapes put together in order to make the general humanoid shape.
To make the dummy I used a series of splines (rectangles and circles) and then used the bevel tool to give the shapes some dimetion, I also used the align and attatch tool in order to attatch the different pieces together.
This model was very difficult to create as I was experementing with tools that I haden't used before. The overall model I am quite happy with although I feel perhaps It could have looked a bit tidier if I had used these sorts of tools before.
Altogether though a good learning experience!
The material I applied to the dummy was hessian, as I believe that this would be the type of material used for the desired purpose.
Here is the finished product:

Thursday, 16 February 2012
Arial Screw Complete
The final steps in creating my Da Vinci helicopter was to put in some wooden supports under the sail and to add materials to the model.
I used the material editor as in earlier tutorials and found two different wood textures online, I saved these and used them as maps in material editor. The only other material I needed was a linen sample as the sail was made mostly of linen.
I used a bump channel in the materials in order to make the model look more realistic, I also added some glossiness to the wood materials.
After finishing I added a turbo smooth to the design in order to smooth off the edges;
Here's the result:

Tuesday, 14 February 2012
Helicopter sail and main supports
the next step for me in creating the Da Vinci helicopter is to create the sail and the main supports of the machine.
My first thought on how to create the sail was to use a tutorial we had done in onr of the earlier classes. I thought that I could use the loft tool to create a spring and manipulate it into the finished sail shape.
I tried with the circle path but I had no luck, I then used a rectangle and lofted that againt the helix. After a few tweaks in the deformation facility using scale to make the ends of the sail less flat and twist in order to flaten the sail out; I had a sail shape I was happy with.
The supports were just made will the cylinder tool and rotated and scaled to fit the model.

Daylight Tutorial
We used the daylight tool in order to create a more realistic feel to some basic objects. I used the material editor in order to put materials onto the objects. I put a mirror effect onto the cone, a glossy paint onto the box and a water effect on the plane.
This is the result:

This is the result:

First glance at lighting
Today we looked at lighting. we first created a scene with random shapes just experiment with the lights. the lights we used first were the omni lights, we also looked at target spot lights.
We used shadow modifiers to experiment with shadows.
First lighting tutorial:

We then downloaded the set model from the Internet and used that to use lighting in a more practical way. We inserted a light into the pumpkin model in order to create a realistic effect. I changed the colour of the light to orange. I changed the intensity to make the light more visible. I also inserted a spot light, I changed the intensity and colour of this also. The colour I chose was purple to give it an eerie feel. (As its a pumpkin :D)

First steps - Arial Screw
The first design that I am going to make is the Da Vinci Arial Screw (Helicopter). I thought that it would make sense to start at the bottom so I began with the base and the turning mechanism.
To begin I created a tube and a cylinder and aligned and attatched them together to create the base, I then made another cylinder to create a 'mast' that the sail will sit on.
The tuning mechanism is again, a set of cyliders in different positions to make the mechanism and the handles;
This is the design so far:

Tuesday, 7 February 2012

Leaf Tutorial
I found the leaf tutorial really useful. I think that it's a good way to minimise modelling and rendering by doing some simple photoshop work before hand.
I can see how this procedure will be handy in the future on different projects.

I can see how this procedure will be handy in the future on different projects.

Material Editor
Today we learned how to apply materials to objects. We began by creating a plank of wood. With this I found a wood texture from the internet and saved it to desktop. I then created a box and applied the texture to the object, I used the material editor to create a bump map, to make the plank look more realistic.
My plank ended up a little stretched as the image I used for the texture was not the correct size and shape for the box that I made.
The second object we put a material to was a teapot. I used the teapot tool in order to create the teapot and made the two sections of the teapot different materials. I did this by using sub object perameters, I then selected just the teapot lid and applied the material, this gave me a wooden teapot with a pink lid:
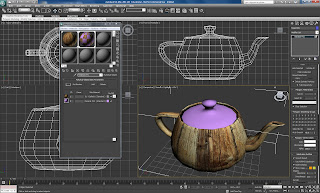

The materials took me a little while to get the hang of but I can see it being extremely useful when it comes to creating the Da Vinci model.
My plank ended up a little stretched as the image I used for the texture was not the correct size and shape for the box that I made.
The second object we put a material to was a teapot. I used the teapot tool in order to create the teapot and made the two sections of the teapot different materials. I did this by using sub object perameters, I then selected just the teapot lid and applied the material, this gave me a wooden teapot with a pink lid:

I then opened up my tutorial from week one (Whitehouse building) and put materials to this. I didn't make it white stone, I experimented with different materials to see what it looked like, it ended up looking like a barn ...

The materials took me a little while to get the hang of but I can see it being extremely useful when it comes to creating the Da Vinci model.
The Da Vinci tank
The second design I am going to look at is the Da Vinci tank also known as the armoured car. This design I think is really important as it is the first tank concept ever thought of. It was designed to break enemy barriers, to minimise casualties and also to scare the opposition during combat.

The tank would have been operated using 8 men constantly turning cranks in order to move the machine. The wood shell was then covered by metal. The tank is tapered in order to help deflect enemy fire.

The tank would have been operated using 8 men constantly turning cranks in order to move the machine. The wood shell was then covered by metal. The tank is tapered in order to help deflect enemy fire.
Thursday, 2 February 2012
The Da Vinci Helicopter
Today, I'm making a start on my mood boards, I'm making three altogether, one design will go on each. The first invention I will be researching further is the Helicopter design.
 I have chosen to look at this design as it is not only one of my favorites but also I think its one of the most influential.
It was designed in 1493 and was based on a Chinese children's toy made nearly 100 years before. It was the first helicopter type design ever made and was way ahead of its time.
It was never actually made but there are now various models made and one is on show in the Boston Science Museum.

It was designed in 1493 and was based on a Chinese children's toy made nearly 100 years before. It was the first helicopter type design ever made and was way ahead of its time.
It was never actually made but there are now various models made and one is on show in the Boston Science Museum.
Tuesday, 31 January 2012
Using the Array Tool
I used the array tool to create a picket fence type of effect. I can imagine this tool being useful if I need to create multiples of a similar thing, without having to re-create the object time and time again.


Boolean - Putting the tea in the teapot!
We used the boolean tool to put letter shaped holes in objects. I First put my name in a box, I then did some experiments with the tool and managed to put the word 'tea' through a teapot.
My name in a box:


My name in a box:

Tea in the teapot!:


Using the lathe tool
In this week's tutorial we learned how to extrude 2D objects in 3Ds max and also how to draw objects in Illustrator and import into max and use the lathe tool to create a 3D shape.
I'm really enjoying this module and learning how to use the software. Even though I've only been using the software for a week; I am beginning to learn the basic tools of the software and recognise the different selections.
Here is my first extrusion:

I then used the lathe tool to create a pawn chess piece and I also experimented with a few other shapes, my first trial was a pineapple but it didn't work out as it isnt symetrically round. I then tried a screwdriver which worked quite well.
Here's my pawn:

This is my failed pineapple:

And this is my screwdriver:

Thursday, 26 January 2012
First Draft, Research Board
Today I concentrated on doing some initial research on Leonardo Da Vinci and all of his workings. I also began constructing a research board. The elements that I most want to cover in my research board are elements of his life and also to throw some light onto his inventions and some other areas of his work in order to start finding a direction for my own assignment.


Tuesday, 24 January 2012
Fruit Tutorial one
The next task we were given was to create some fruit. The frist fruit I made was an apple. I really enjoyed this task as I liked using the soft selection tool to make the apple look more realistic by putting in lumps and bumps.
I also put a stalk in my apple by inserting a cylinder and used the 'bend' modifying tool.
Here's the apple:

I also put a stalk in my apple by inserting a cylinder and used the 'bend' modifying tool.
Here's the apple:

Tutorial One
The First Tutorial that we did is to create a well known building out of primitive shapes in the software.
The building I chose for my task is The White House. It took me a long time to construct as it was my first ever model and I was getting used to the tools.
The first thing I did was to construct a box for the main body of the building. I then created a triangular prism, which I had problems with unitl I was told it was a cylinder and you just changed the number of sides to three.
I then used the align tool to align it with the main body, this created a porch effect.
The next step was to create the pillars, these were made using the cylindar tool again but increasing the amount of sides to the shape.Even thought The White House has sixteen pillars, I only put six into my structure as any mare made it look far too crowded.
This is my finished product:

Reaction to brief
After reading the brief, I am looking forward to completeing the tasks in hand.
I currently have no experience with 3D Max what so ever so I'm sure I'll learn a lot from this module.
The assignments sound interesting and that will help me to make the most out of the module as it will keep me engaged.
It will be good to learn the techniques stated in the brief, but I don't really know what they are at the moment so I can't really say a lot ....
Thats about it :)
Subscribe to:
Posts (Atom)