The first six weeks of this module have been really interesting for me. I've really enjoyed doing all the research about DaVinci as I didn't really know a lot about him before; I think he was a really talented person and also prety inspirational.
I've also really enjoyed learning about the 3ds max software. I've found it easier than I expected it to be in comparison to learning how to use Flash last year; although I have got stuck and had my fair share of confused moments I feel I have got the hang of the very basics of the software and feel excited to get stuck into learning more about it and more animation tools in the weeks to come.
The three models I have created I feel pleased with especially the Da Vinci model, I think that it looks pretty realistic and as it was my very first model I'm really proud of it.
All in all; I'm really enjoyiong the module and feel I have learned a lot both from Richard and from using online tutorials.
Tuesday, 28 February 2012
Cameras
We also learned about cameras in this weeks tutorial. The first type we looked at was target cameras.

I set this camera on a path that I made from a circle spline. With the target camera you can select where the target of the camera sits. When the camera moves it moves around the path and contantly points at the manually placed target.
The second type of camera that we looked at is the free camera. This is how it sounds, free. there is no main target.

In this part of the tutorial we made a basic scene out of standard primitives. I then created a path using the line tool. With my path made I then inserted a free camera. I set this to go around the path I had drawn. The camera was for some reason pointing down so I rotated it so that it was facing the right way.
When I played the animation I noticed that it was travelling way to fast, so I slowed it down in the dope sheet. Ialso gave the camera a bank as it goes round the corners, this gives the simulation a sort of rollercoaster feel.
First Look - Animation
Today we learned the basics of animation of 3ds max. I enjoyed these tutorials and found it easier than making animation in flash.
The tutorial that we did was creating 3 bouncing balls bouncing at different times.

To do this I created one sphere to begin woth and animated it so that it just went up and down once. I then used the curve editor to make the bounce look more realistic by slowing the movement down as it reaced the top of the bounce and speeding it up as it is at the bottom of the bounce.
When I was happy with that result I then looped the motion so that it carried on throughout the entire length of the animation.
I then copied the ball twice so that I had three balls. I opened the dope sheet and edited it so that each ball bounced at separate times and at different speeds.
I had a bit of a problem on my first go as I had made copies of the sphere when auto key was still active this made it look like one ball morphing into three!
I was happy with the outcome of this tutorial and very much enjoyed it.
Tuesday, 21 February 2012
Launch Pad
The third model I will create is a launch pad for the arial screw. In order to create this I used lots of different standard primitives aligned and attatched together to make the launch pad.
I wanted steps up to the platform so I had a look at the stairs tool. I tried the different stairs avaliable, for instance, spiral stairs, straight stairs, Ltype stairs and Utype stairs, none of which gave the effect I was looking for; so instead I used the box tool to create the steps and attatched them together using >editable mesh > attatch.
The materials that I used on the launch pad were three different wood textures. I chose wood as I have seen from the research I have done on Da Vinci and the time, wood would have been the favourable option.
I am happy with the finished result and really enjoyed making this one.

Da Vinci Giant Crossbow And Final Decision
The third design that I had looked at was the giant crossbow. This invention really stood out for me as I thought the pure scale and reason for design were outstanding.

Da Vinci knew that the fear that a weapon bestowed on the enemy was just as damaging and dangerous as the damage it could physically inflict.
This crossbow was intended to be 27 yards wide and would have had six wheels each side.
Final Decision
I chose the arial screw over the other two designs as it is my favourite. I think that the idea was revolutionary and I feel that I could encorporate more skills into the arial screw than to the other designs I have looked at
Crash Test Dummy
The second model I have produced will be a 'crash test dummy', a humanoid shaped model with the intent to display how the people would have used the machine. I wanted to make the model quite simply, just primitive shapes put together in order to make the general humanoid shape.
To make the dummy I used a series of splines (rectangles and circles) and then used the bevel tool to give the shapes some dimetion, I also used the align and attatch tool in order to attatch the different pieces together.
This model was very difficult to create as I was experementing with tools that I haden't used before. The overall model I am quite happy with although I feel perhaps It could have looked a bit tidier if I had used these sorts of tools before.
Altogether though a good learning experience!
The material I applied to the dummy was hessian, as I believe that this would be the type of material used for the desired purpose.
Here is the finished product:

Thursday, 16 February 2012
Arial Screw Complete
The final steps in creating my Da Vinci helicopter was to put in some wooden supports under the sail and to add materials to the model.
I used the material editor as in earlier tutorials and found two different wood textures online, I saved these and used them as maps in material editor. The only other material I needed was a linen sample as the sail was made mostly of linen.
I used a bump channel in the materials in order to make the model look more realistic, I also added some glossiness to the wood materials.
After finishing I added a turbo smooth to the design in order to smooth off the edges;
Here's the result:

Tuesday, 14 February 2012
Helicopter sail and main supports
the next step for me in creating the Da Vinci helicopter is to create the sail and the main supports of the machine.
My first thought on how to create the sail was to use a tutorial we had done in onr of the earlier classes. I thought that I could use the loft tool to create a spring and manipulate it into the finished sail shape.
I tried with the circle path but I had no luck, I then used a rectangle and lofted that againt the helix. After a few tweaks in the deformation facility using scale to make the ends of the sail less flat and twist in order to flaten the sail out; I had a sail shape I was happy with.
The supports were just made will the cylinder tool and rotated and scaled to fit the model.

Daylight Tutorial
We used the daylight tool in order to create a more realistic feel to some basic objects. I used the material editor in order to put materials onto the objects. I put a mirror effect onto the cone, a glossy paint onto the box and a water effect on the plane.
This is the result:

This is the result:

First glance at lighting
Today we looked at lighting. we first created a scene with random shapes just experiment with the lights. the lights we used first were the omni lights, we also looked at target spot lights.
We used shadow modifiers to experiment with shadows.
First lighting tutorial:

We then downloaded the set model from the Internet and used that to use lighting in a more practical way. We inserted a light into the pumpkin model in order to create a realistic effect. I changed the colour of the light to orange. I changed the intensity to make the light more visible. I also inserted a spot light, I changed the intensity and colour of this also. The colour I chose was purple to give it an eerie feel. (As its a pumpkin :D)

First steps - Arial Screw
The first design that I am going to make is the Da Vinci Arial Screw (Helicopter). I thought that it would make sense to start at the bottom so I began with the base and the turning mechanism.
To begin I created a tube and a cylinder and aligned and attatched them together to create the base, I then made another cylinder to create a 'mast' that the sail will sit on.
The tuning mechanism is again, a set of cyliders in different positions to make the mechanism and the handles;
This is the design so far:

Tuesday, 7 February 2012

Leaf Tutorial
I found the leaf tutorial really useful. I think that it's a good way to minimise modelling and rendering by doing some simple photoshop work before hand.
I can see how this procedure will be handy in the future on different projects.

I can see how this procedure will be handy in the future on different projects.

Material Editor
Today we learned how to apply materials to objects. We began by creating a plank of wood. With this I found a wood texture from the internet and saved it to desktop. I then created a box and applied the texture to the object, I used the material editor to create a bump map, to make the plank look more realistic.
My plank ended up a little stretched as the image I used for the texture was not the correct size and shape for the box that I made.
The second object we put a material to was a teapot. I used the teapot tool in order to create the teapot and made the two sections of the teapot different materials. I did this by using sub object perameters, I then selected just the teapot lid and applied the material, this gave me a wooden teapot with a pink lid:
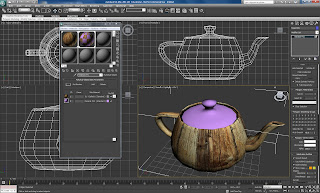

The materials took me a little while to get the hang of but I can see it being extremely useful when it comes to creating the Da Vinci model.
My plank ended up a little stretched as the image I used for the texture was not the correct size and shape for the box that I made.
The second object we put a material to was a teapot. I used the teapot tool in order to create the teapot and made the two sections of the teapot different materials. I did this by using sub object perameters, I then selected just the teapot lid and applied the material, this gave me a wooden teapot with a pink lid:

I then opened up my tutorial from week one (Whitehouse building) and put materials to this. I didn't make it white stone, I experimented with different materials to see what it looked like, it ended up looking like a barn ...

The materials took me a little while to get the hang of but I can see it being extremely useful when it comes to creating the Da Vinci model.
The Da Vinci tank
The second design I am going to look at is the Da Vinci tank also known as the armoured car. This design I think is really important as it is the first tank concept ever thought of. It was designed to break enemy barriers, to minimise casualties and also to scare the opposition during combat.

The tank would have been operated using 8 men constantly turning cranks in order to move the machine. The wood shell was then covered by metal. The tank is tapered in order to help deflect enemy fire.

The tank would have been operated using 8 men constantly turning cranks in order to move the machine. The wood shell was then covered by metal. The tank is tapered in order to help deflect enemy fire.
Thursday, 2 February 2012
The Da Vinci Helicopter
Today, I'm making a start on my mood boards, I'm making three altogether, one design will go on each. The first invention I will be researching further is the Helicopter design.
 I have chosen to look at this design as it is not only one of my favorites but also I think its one of the most influential.
It was designed in 1493 and was based on a Chinese children's toy made nearly 100 years before. It was the first helicopter type design ever made and was way ahead of its time.
It was never actually made but there are now various models made and one is on show in the Boston Science Museum.

It was designed in 1493 and was based on a Chinese children's toy made nearly 100 years before. It was the first helicopter type design ever made and was way ahead of its time.
It was never actually made but there are now various models made and one is on show in the Boston Science Museum.
Subscribe to:
Comments (Atom)